Pages

16 April 2020

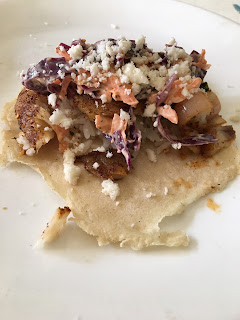
Spicy Fish Tacos with Lemon Dill Slaw and Homemade Tortillas


     It's been several weeks since the novel coronavirus pandemic rocked the world and Americans have been spending much more time in their own homes and kitchens than normal. For me, the stress of the world changing every minute seems to have melted into an equally anxiety-ridden drudgery ... a nameless fear that this is all there is and will never end. (I promise, that's not true! Don't believe it for a second!) Even meals were starting to feel mundane.
    This recipe was born while I was struggling through yet another Zoom webinar, working from home. I found that daydreaming about dinner tonight helped me get through the day, and gave me something to look forward to that was different than yesterday. And isn't that what aches the most about mundanity ... the lack of spice and adventure?
     I hope this recipe inspires you to set aside a little time to plan ahead for something different for dinner tonight. It will give you something to look forward to, and you just might become the parent to an awesome new recipe yourself.

Ingredients:
For the fish:
  • 4 Tilapia fillets, thawed
  • 2 tsp Old Bay seasoning
  • 1/2 tsp ground allspice
  • 1/2 tsp cumin
  • 1 tsp paprika
  • 1/2 tsp tabasco powder
  • 1/2 tsp kosher salt
  • 1 shallot
  • 3-4 whole ramps
  • Olive oil
For the corn tortillas (makes about 16):
  • 2 cups instant masa
  • 2/3 cup water
For the slaw:
  • 1 cup grated carrot (about 1 medium)
  • 1 cup shredded or chopped red cabbage
  • 1/4 cup Greek yogurt
  • 1/4 cup mayonnaise
  • 1 Tbsp lemon juice
  • 1/4 tsp dried dill
  • Salt and pepper to taste
Other:
  • Leftover cooked rice
  • Salsa
  • Crumbly cheese (your choice!)
Rinse and pat dry the fish fillets. Stir together the Old Bay, allspice, cumin, paprika, tabasco powder, and salt in a small bowl. Coat both sides of each fillet with this spice rub, then place on a plate covered with plastic wrap in the fridge for at least 2 hours.

Grate the carrot and shred the cabbage, then stir together with the Greek yogurt, mayo, lemon juice, dill, and a hint of salt and pepper. Store in the fridge to let the flavors meld at least 1 hour.

Prepare the corn tortillas according to the Instant Masa package directions. Mix together masa and water into a soft dough, then divide into about 16 palm-sized balls. Use a tortilla press or a rolling pin to flatten into 6-inch round circles. Cook for about 30 seconds on each side in a hot, dry skillet. This is easier done as a team if possible, with one person rolling tortillas and the other cooking them. You may have leftover tortillas from this meal; be sure to keep them dry and eat within a couple days because they don't last as long as store-bought. (They taste much better though!)

Preheat the oven to 425. Chop the ramps (green and white parts) into 2 inch sections and chop the shallot into large chunks. Toss both ramps and shallots in a little olive oil, then spread out on a lightly oiled baking sheet. Place the fish on the sheet and position the ramps and shallots around and on top of the fish. Bake for 7-10 minutes or until the fish reaches an internal temperature of 165.

Reheat the leftover rice (or prepare some new rice if you don't have leftovers), and season with your choice of dried green spices. We used Italian seasoning this time but if I had it, I would have chosen cilantro.

Roughly chop the fish into large chunks and serve with the roasted ramps and shallots all mixed together in a bowl. Present the tortillas, slaw, seasoned rice, fish, cheese, and salsa choices on the table so that each person can build their own tacos. Four tacos a piece is probably more than enough.


15 March 2016

Southern Style Cheddar and Buttermilk Skillet Biscuits (a.k.a. Cheddar Time Biscuits)

After we moved away from our beloved Tudor's Biscuit World, I wanted to learn how to make my own southern style buttermilk biscuits. So somehow I found this awesome recipe where you cooked them in a cast iron skillet. It worked great. Then I wanted to make them again. But I couldn't find the recipe anywhere! So after a lot of trial and error, I kind of pulled directions and ingredient amounts from three different recipes to finally find a version that worked for me. After a few months, I experimented with adding grated cheddar and dried thyme leaves. I got it down pretty good, and I put the recipe on my phone.

Then I broke my phone. And there was no way to get the recipe off of that. So today, once again, I wrote down as much as I could remember, sought a few different biscuit recipes for general guidance, and then did some experimenting in the kitchen until my dough looked right (even trying to pull the best ideas from other recipes, I couldn't seem to get it right without adjusting it myself). And here is that recipe. It seemed to turn out great. But I might come back here and tweak it again if I find out something isn't quite right.

PS: I call these "Cheddar Time Biscuits." Because there is cheddar and thyme. You can easily leave out either or both of these ingredients if you just want normal buttermilk biscuits.

Ingredients:


  • 1 stick of butter
  • 3 1/4 c self rising flour
  • 3/4 c sharp cheddar cheese, grated
  • 1/2 Tbsp dried thyme
  • 1 1/4 c buttermilk*

Preheat oven AND oiled cast iron skillet to 475.

Cut 5 Tbsp from your stick of butter, and cube it. Put it in the freezer to chill (you'll want it to be in there around ten minutes, probably, but you can do other stuff during this time. *If you don't have buttermilk, you can add 1 Tbsp of either vinegar or lemon juice to your milk--personally, I add 1/2 Tbsp lemon juice + 1/2 Tbsp vinegar. If needed, do this now, as well. You'll need this to be mixed and sitting for about ten minutes, too).

The other 3 Tbsp of butter you'll need to have melted eventually, so I usually just put this in a little glass jar or bowl or something, melt it in the microwave, and just leave it there until I need it.

Put your flour in a bowl. When your butter is pretty cold and hard, cut that into the flour. You're looking for roughly pea-sized clumps of butter evenly distributed throughout the flour. Add the cheese and thyme, and make sure it's distributed well.

Add your buttermilk to the flour. Sometimes I start mixing with a wooden spoon, but in the end I usually find it works better just mushing it with my own hands. It's messy, but I haven't figured out a great solution to this yet. Maybe I should get some gloves or something. Get it kind of into a ball, or a lumpish shape, anyway.

Lightly flour a working surface, then dump your lump of dough onto that. You'll want to roll or flop it around until it's also lightly covered with flour on the outside. Flatten the lump out with your hands until it's a flat circle about somewhere between 1 and 3 inches thick. Take a circular cutter and cut out all the biscuits you can. I usually cut mine with a cup that's I think about the same size of a red Solo cup at its mouth. You should end up with somewhere between 6 and 10 biscuits, depending on how big you cut them.

Using a potholder (because it's going to be very hot!), remove the cast iron skillet from the oven. Add your biscuit shapes until you can't really fit anymore. If you look in my picture, I fit 8 biscuits into my 10" skillet, but I had to use a fork to kind of squish some to make more room. I had two left over, which I just threw on a baking sheet on another oven rack.

Use one of those food brush doohickeys and cover the tops of your biscuits with the melted butter. Try to spread it as even as possible, or you'll have some biscuits that have pools of butter on top and some that are dry.

Bake them for around 15 minutes. The buttered tops should turn crispy and golden brown. Remove from the oven; let cool. I always try to skip that step and end up burning my tongue. Just hold yourself back as long as possible.

24 January 2015

Emily's Sweet & Tangy Chili

A new year calls for a new chili recipe! I was aiming for a simple vegetarian chili with a traditional texture but a truly unique flavor. I love this chili's blend of tang and sweetness with a kick of spice. All of the ingredients should be easy to come by with the exception of the dried ramps. Substitute with onion flakes or more garlic if you must, but if you can get your hands on some dehydrated ramps, you'll experience the true flavor of this recipe. Enjoy with a dollop of sour cream (unless you want to go vegan!) and a side of cornbread.

If you are in the mood for a chunkier, more complex vegetable chili, check out our fantastic Sweet Potato Symphony Vegetarian Chili

Ingredients:

  • 1 large onion
  • 2 large garlic cloves
  • Coconut oil for sauteing
  • 1 lb package of dried kidney beans, prepared*
  • 2 cans diced tomatoes with liquid (14 1/2 oz per can)
  • 1 (10 oz) can Campbell's Tomato Soup
  • 2 soup cans full of water (use the tomato soup can)
  • 1/2 c canned jalapeno rings (drained)
  • 3 Tbsp chili powder
  • 1 Tbsp cumin
  • 1 tsp cocoa powder
  • 1 tsp oregano
  • 1 tsp basil
  • 1 tsp parsley
  • 1 tsp dried ramp flakes**
  • 1 Tbsp molasses
  • Fresh-squeezed juice of half a lime
  • Salt and pepper to taste

Dice the onion and press the garlic and add both to a large soup pot with about a tablespoon of oil (I used coconut, but you can use whatever oil you prefer). Saute onion and garlic over medium heat until fragrant and translucent. Add both cans of tomatoes with their liquid, tomato soup, water, beans, and jalapenos. Slowly bring to a gentle boil. Reduce heat to a simmer and stir in the rest of the ingredients. Continue to simmer at a low heat for a good long while (an hour or more) until flavors are melded, consistency is thick, and you are ready to eat! Season with salt and pepper as needed.

* I typically prepare dry beans by rinsing and sorting them to pick out any sticks or pebbles, and then covering with an inch or so of water and bringing to a boil. I'll boil the beans for a few minutes, then remove from heat, cover, and let beans soak for at least an hour. After beans have soaked, drain the water, rinse them, and cover with fresh cool water. Bring to a boil again, and then simmer for 1 1/2-2 hours. Check for doneness by smashing a bean with the back of a spoon to see if they are tender inside. Drain and rinse beans again before adding to recipe.

**Wild ramps can be gathered in the springtime in many parts of the Appalachians. In West Virginia, you can also purchase them at farmer's markets or by the side of the road throughout the spring season. Stock up on ramps when they are in season and dry them in a food dehydrator until completely dry and crumbly. Crush the ramps coarsely until they resemble dried oregano. Store in a clean and dry spice shaker and add to all sorts of recipes for subtle ramp flavor without the stink all year round.

15 April 2014

Snack of the Night: Cap'n Chewy Bars

These are basically rice crispy treats with Cap'n Crunch cereal instead and a little bit of one of my favorite ingredients, almond extract. Note the high measurement of cereal compared to a normal rice crispy treat recipe. This is because the cereal is measured before you crush it, so it seems like more than it really is.


Ingredients:

  • 10 c Cap'n Crunch cereal (almost a whole 14 oz. box!)
  • 4 Tbsp butter or margarine
  • 10 oz. marshmallows (most normal-sized packages are 10 oz.)
  • 1/2 Tbsp almond extract

Begin by measuring out the Cap'n Crunch into a bowl and crushing it into courser, smaller bits. You're not going for a fine powder here, though--you want the pieces to be similar in size to the size of rice crispy cereal. The reason you're crushing it is to make the cereal a bit denser. I tried making these before without crushing the cereal, and it didn't really stay together very well because it was much larger than puffed rice and it was hard to form it into bars. After you crush the 10 cups of cereal, it should end up fitting into somewhere around 6 cups of cereal, since more of it fits into the measuring cups at once. If it's more or less, that's okay, as long as it's about in the ballpark. Here's a picture of what my cereal looked like after it was crushed:

The size of each piece will vary, obviously. Some are still whole, while some of it turned into a powder. You're going for something between these two extremes.


I went back and forth between using a potato masher and my own hands to crush the cereal. I'm not really sure which worked better. I'm thinking using my hands was a little better because I could feel exactly what I was doing. The potato masher just ended up making the stuff on the bottom turn into a powder before the stuff above it got crushed very well. Anyways, experiment and see what works best for you. After you finish, set the bowl of crushed cereal aside.

In a medium saucepan, melt the margarine over low heat. Add marshmallows and almond extract, stirring until the mixture is melted and blended, not lumpy.

Pour the marshmallow mixture into the bowl and mix with the cereal evenly with a wooden spoon or spatula. Spread and press this firmly into a buttered 13x9 inch pan. Cut into squares when cool.


08 April 2014

Garlicky Tomato Alfredo


This bare-bones recipe uses mostly ingredients you can find in your cupboard or fridge and can be whipped up in under 20 minutes. Perfect meal for after a run or a weeknight when you're too tired to cook anything fancy, but want to eat something that tastes fancy. I threw this recipe together without much planning, so if you have a more creative idea for it or want to use different spices, have at it!


Ingredients:

  • 2 cloves minced garlic
  • 4 Tbsp butter
  • 4 Tbsp flour
  • 1/2 tsp kosher salt
  • 1/2 tsp Montreal steak seasoning
  • 1/2 tsp crushed red pepper
  • 1 1/2 c milk
  • 1 14.5 oz. can of diced tomatoes, undrained
  • 1 13 oz. box of whole wheat thin spaghetti

Bring a pot of water to a boil for the spaghetti. Cook according to package directions.

Meanwhile, mince the garlic and let it sit in a large frying pan for about 10 minutes. Add butter and melt over medium-low heat. Whisk in flour, salt, Montreal steak seasoning (you can easily substitute black pepper, or any spice you desire), and crushed red pepper. Continue to cook until smooth, being careful not to let the mixture burn. Gradually whisk in the milk and bring to a boil. Let boil gently for 2-3 minutes, stirring constantly, until the sauce is nice and thick. Add the entire can of tomatoes with juices, bring back to a boil, and stir for another 2-3 minutes or so.

Drain pasta. Serve sauce over pasta and be sure to get a breathmint after eating because this meal is very garlicky! :)

28 February 2014

Three Cheese Roasted Potato Melt

I had a hankerin' for some cheesy taters, so we figured out this little yummy dish.


Ingredients:

  • About 6 medium red potatoes
  • 5 Tbsp olive oil
  • 1 tsp granulated garlic
  • 3/4 tsp salt
  • 1/2 tsp oregano
  • 1 tsp crushed red pepper
  • 3/8 c KRAFT grated Parmesan cheese
  • 1 1/4 c grated sharp cheddar cheese
  • 1 3/4 c grated muenster cheese

Preheat oven to 400˚.

Rinse and chop potatoes into quarters or smaller. Leave the skins on.

In large mixing bowl, combine the olive oil, garlic, salt, oregano, red pepper, and Parmesan. Toss the potato chunks until they are evenly coated.

Line a cookie sheet with aluminum foil and coat with nonstick cooking spray. Spread the potatoes in a single layer on the cookie sheet. Put in oven and bake for 40 minutes, turning the potatoes halfway through the cooking time.

Line a 9x9 pan with aluminum foil and coat with nonstick cooking spray. Transfer roasted potatoes from the cookie sheet to the 9x9 pan and top with cheddar and muenster cheeses. Put back in oven and bake for another 5 minutes to melt the cheese.

Serves 3 people.


"Just a little mo' 'taters, mum!"

23 February 2014

Coming Soon...


We are at the end of our month's food budget and running out of ingredients, but I still wanted something besides rice or cereal (oh yeah, we're also trying to stretch out the last box of cereal and 3/4 gallon of milk to last the rest of the week). Specifically, I wanted some potatoes, and I wanted a lot of cheese! Check back on Friday for our Three Cheese Roasted Potato Melt recipe!  Coming soon to a Hungry Huguenins blog near you! YUMMMMMM!